window 使用技巧
window11&office激活
根据Microsoft-Activation-Scripts 的最新介绍,不用手动下载,可通过PowerShell轻松运行该工具
在 Windows 8.1/10/11 上,右键单击 Windows 开始菜单并选择運行, 輸入
PowerShell复制粘贴以下代码并按回车
irm https://massgrave.dev/get | iex会弹出激活选项,并按照屏幕上的说明进行操作,输入1,实现Win10/11永久激活
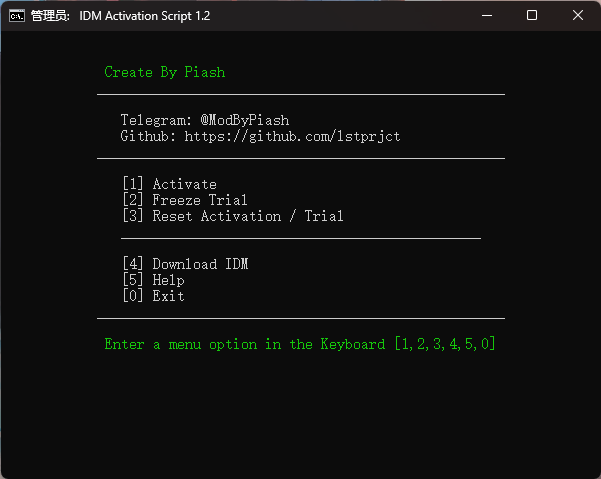
idm激活
https://github.com/orangbus/IDM-Activation-Script
1、先从官网下载idm,直接安装
2、运行下面的脚本l,根据选项激活即可。
iex(irm is.gd/idm_reset)

irm https://raw.githubusercontent.com/lstprjct/IDM-Activation-Script/main/IAS.ps1 | iex
Windows Terminal默认打开路径
{
    "guid": "{61c54bbd-c2c6-5271-96e7-009a87ff44bf}",
    "name": "Windows PowerShell",
    "commandline": "powershell.exe",
    "hidden": false,
    "startingDirectory" : "d:/laragon/www/"
},
Windows Terminal中WSL默认打开路径(startingDirectory)
"startingDirectory": "//wsl$/Ubuntu-20.04/home/baiguo",
Cmd 打开当前文件夹
start .

explorer .
Ps: 仔细看后面是有一个点的
Window10-11官方下载
window10:https://www.microsoft.com/zh-cn/software-download/windows10ISO
window11: https://www.microsoft.com/zh-cn/software-download/windows11
如果你有更好的资源,请联系我! 其实我收藏了太多了,懒得整理了,以后关注的人多了在说吧!
window git别名
# cd
# vim .bashrc

alias cls='clear && ls'
alias la='ls -a'

alias web="cd /d/laragon/www"
alias code="cd /f/golang/code"
重载配置
source .bashrc
设置git默认地址
git config --get push.default
git config push.default simple
git config --global push.default simple
微信多开
# 创建一个 wechat.bat 文件,按照这个格式编辑保存,双击运行即可

start "" "D:\Program Files (x86)\Tencent\WeChat\WeChat.exe"
start "" "D:\Program Files (x86)\Tencent\WeChat\WeChat.exe"
清理C盘的3种办法
1、使用电脑管家快速清理
2、转移C盘安装软件到其他盘
3、修改C盘 appData 位置
打开注册表:regedit
计算机\HKEY_CURRENT_USER\SOFTWARE\Microsoft\Windows\CurrentVersion\Explorer\User Shell Folders
# 以及
计算机\HKEY_CURRENT_USER\SOFTWARE\Microsoft\Windows\CurrentVersion\Explorer\Shell Folders
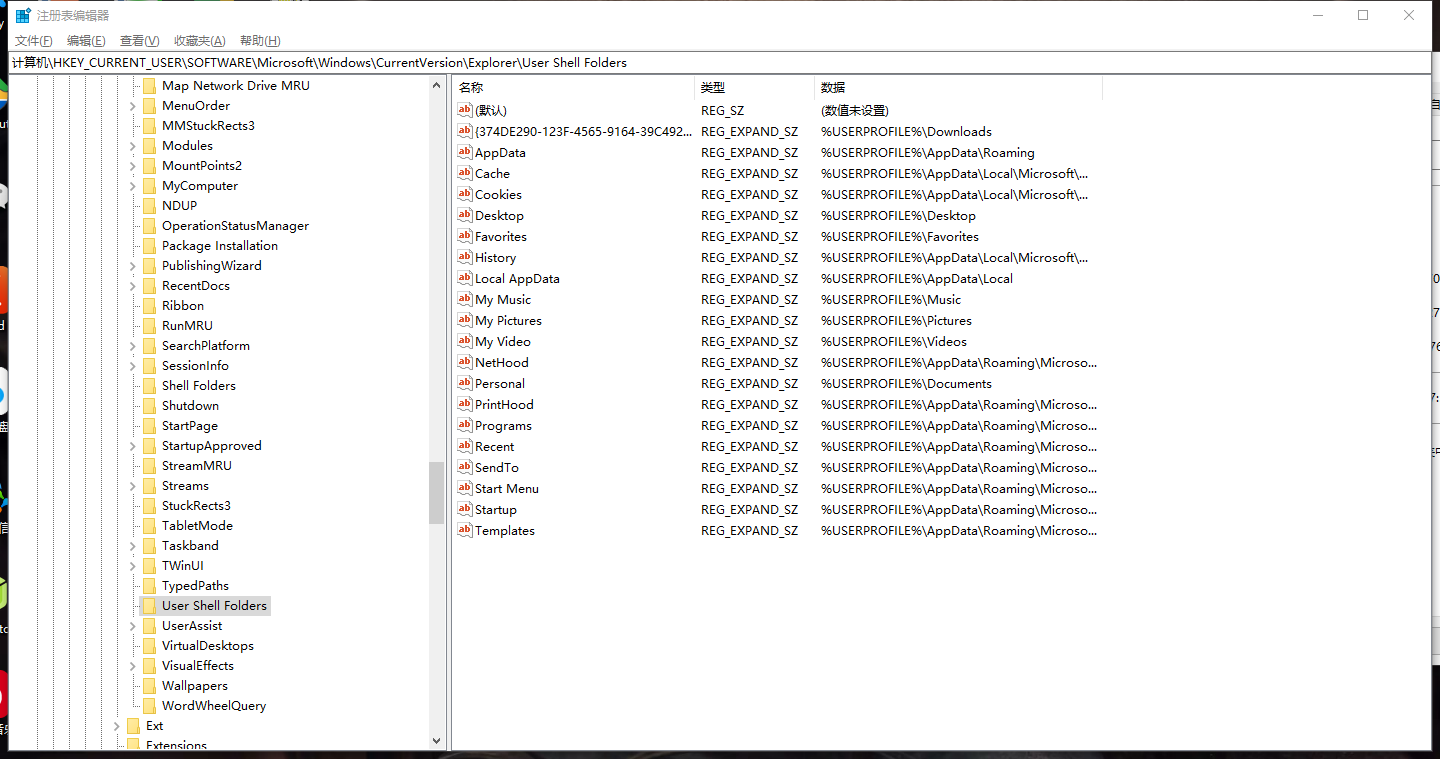
修改后
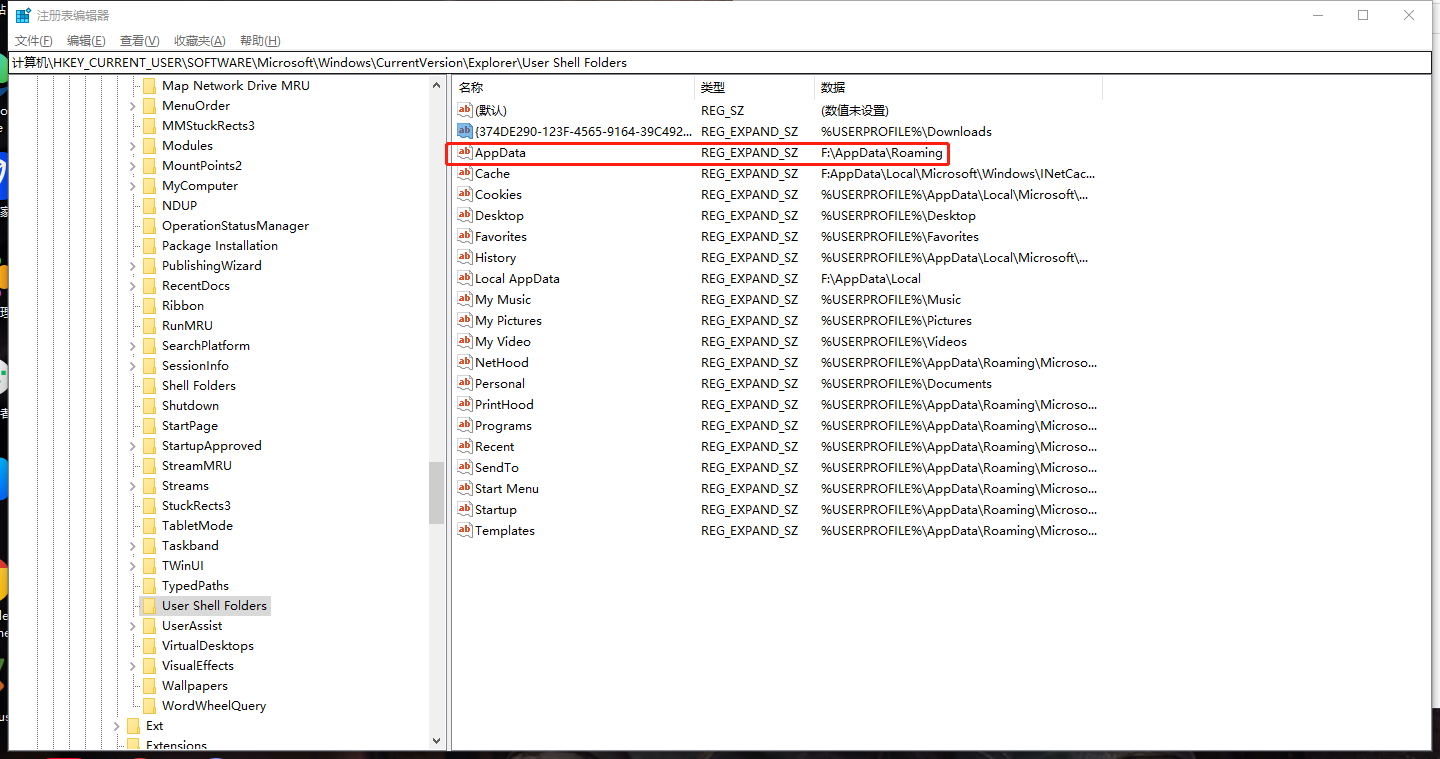
接着把 C:\Users\$USER$\AppData 复制到你自定义为位置,重启电脑即可
对于c盘的文件,你可以查看你改动过的目录,把对应的目录文件删除即可,其他没有改动的文件就保持原来的。
window下如何给git bash添加别名
方法一
vim /etc/profile
在该文件的最后面添加我们的别名
alias web='cd /d/laragon/www'
alias cls='clear && ls'

# git
alias ga="git add ."
alias gm='git commit -m'
alias gp="git push $1"

# laravel 快捷别名
alias pa='php artisan '
alias pac='pa make:controller '
alias pae='pa make:event '
alias pahm='pa ide-helper:models'
alias pam='pa make:model '
alias pamm='pa migrate'
alias paqc='pa queue:clear'
alias paqw='pa queue:work'
alias pas='pa serve'
alias pat='pa tinker'
alias pats='pa telescope:clear'
alias pacms="pa make:command "
alias php81="/www/server/php/81/bin/php"

alias llw="ls -l | grep "^-" | wc -l"
使其生效即可
source /etc/profile
方法二
cd // 回到home目录
vim .bashrc

=== 添加你自己的别名==
alias web='cd /d/laragon/www'
alias cls='clear && ls'

# git
alias ga="git add ."
alias gm='git commit -m'
alias gp="git push $1"
使其生效
source /etc/profile
清理npm缓存
npm cache clean --force
npm config set registry https://registry.npm.taobao.org
# npm install -g node-pre-gyp
composer clear-cache
pip cache purge
不走代理的配置
*.test;
192.168.*;
127.0.0.1;
locahost;
home.com;
*.home.cc
nvm配置镜像源
https://developer.aliyun.com/article/971101
安装的目录下打开settings.txt文件
node_mirror: https://npm.taobao.org/mirrors/node/
npm_mirror: https://npm.taobao.org/mirrors/npm/
设置npm为淘宝源
npm config set registry https://registry.npm.taobao.org
npm config set disturl https://npm.taobao.org/dist
查看
npm config get registry
跳转代理设置
添加一个快捷方式,地址填写下面的
ms-settings:network-proxy
共享文件配置
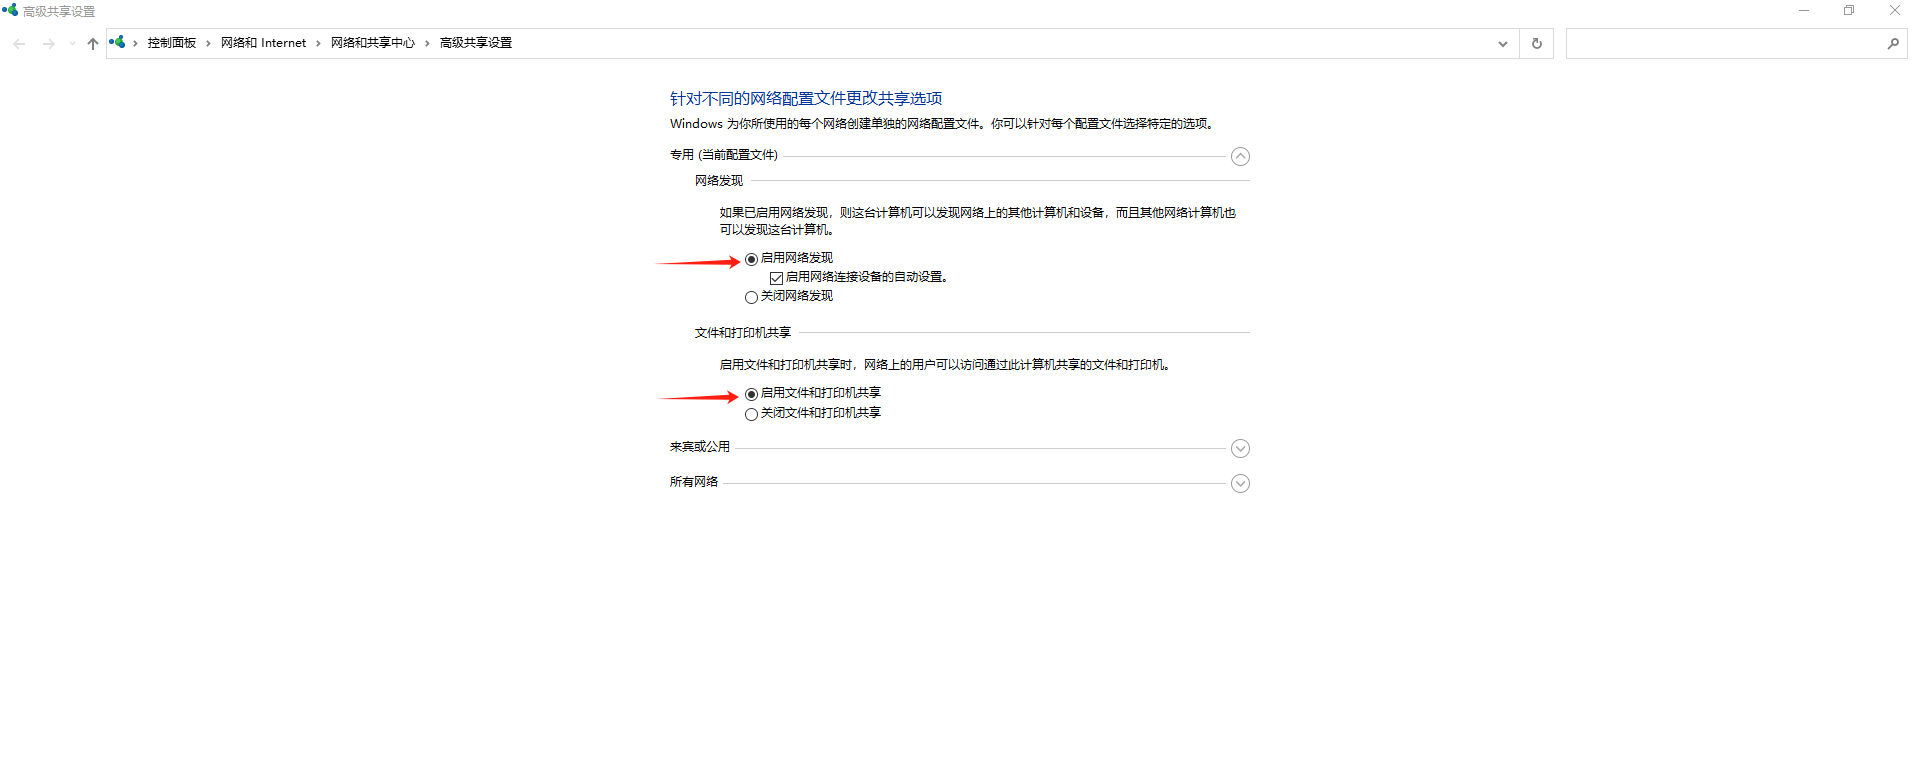
开启smb
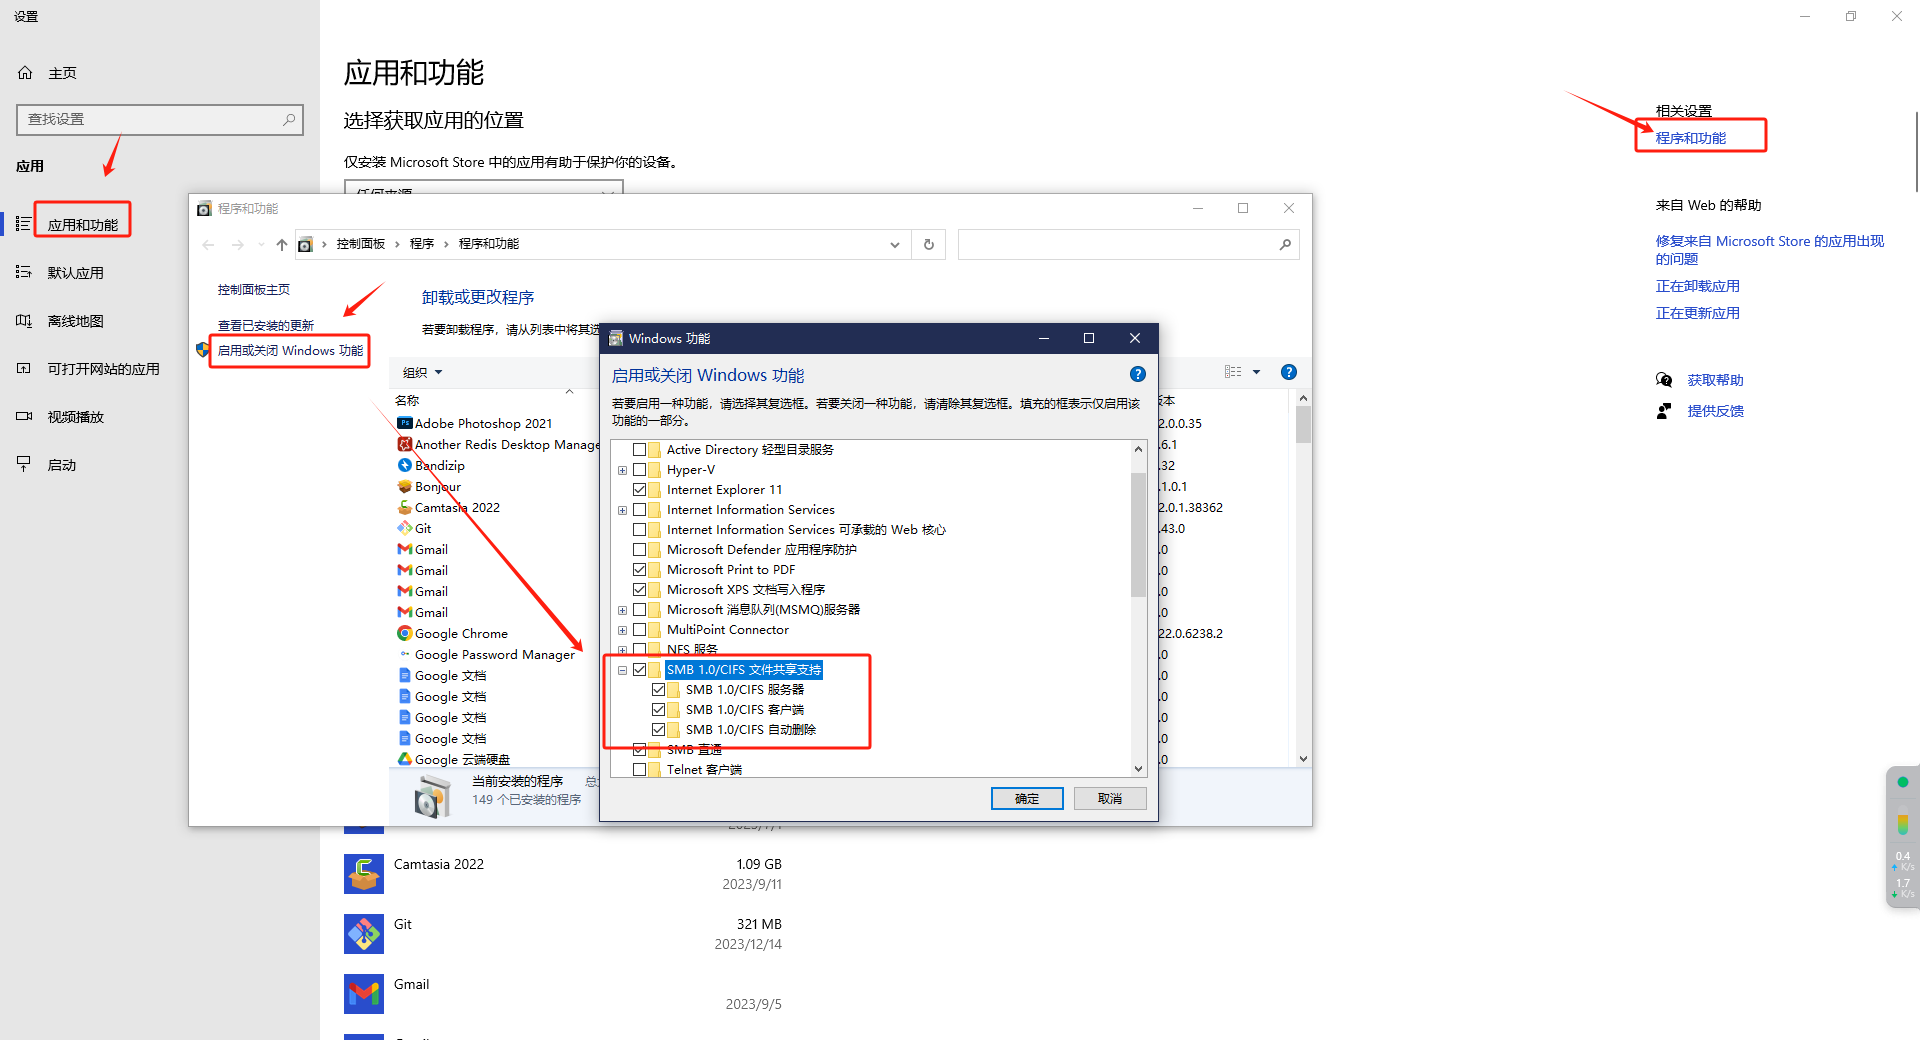
开启网络共享
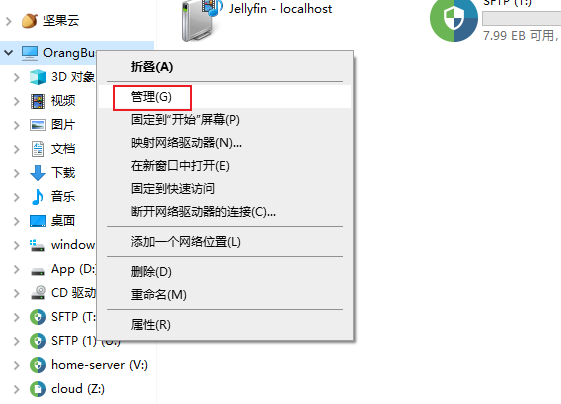
打开管理
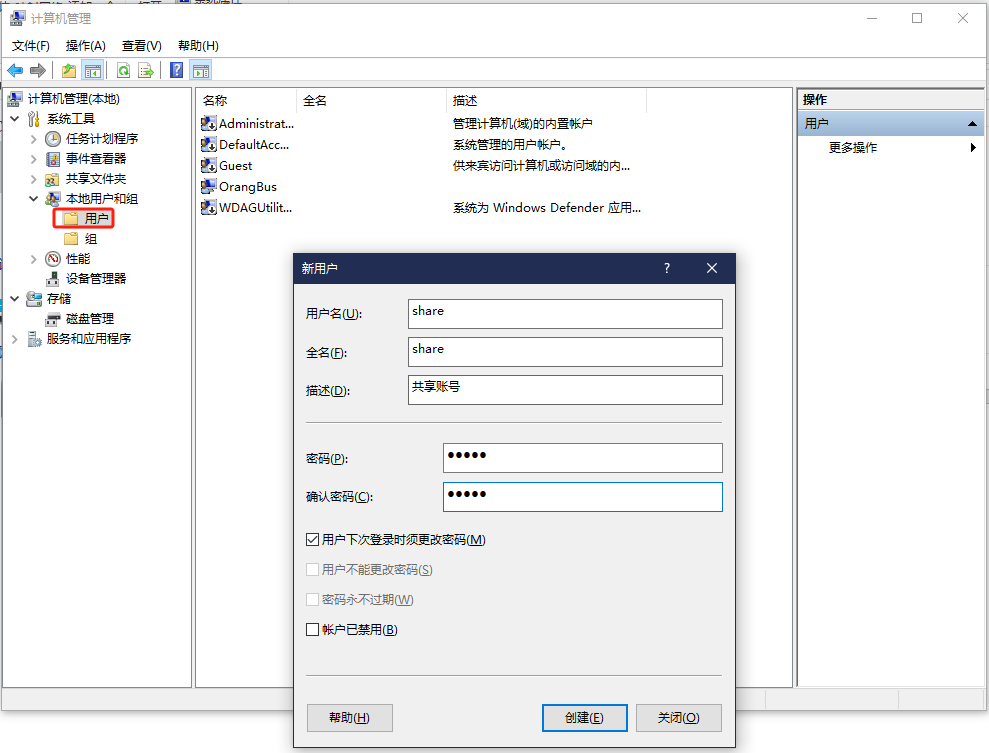
找到用户,在空白区域右【新建用户】
授权访问
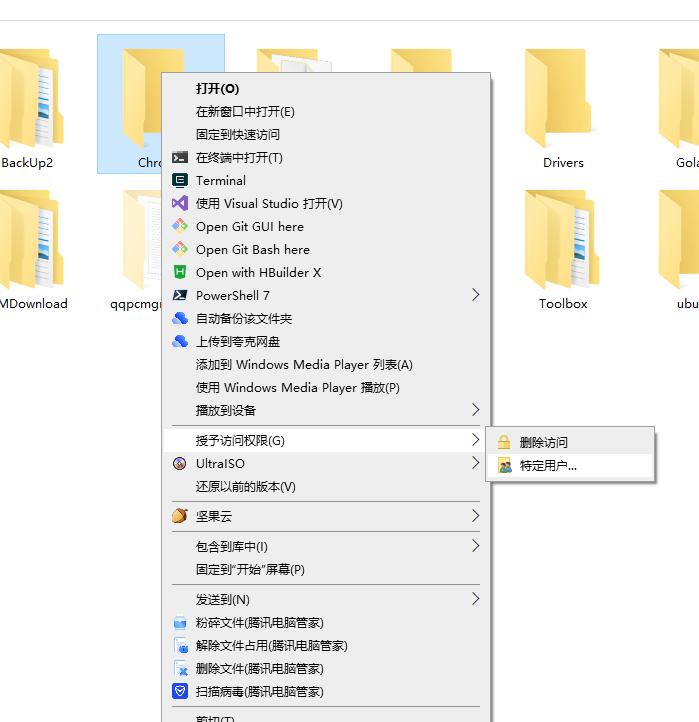
选择刚刚添加的用户
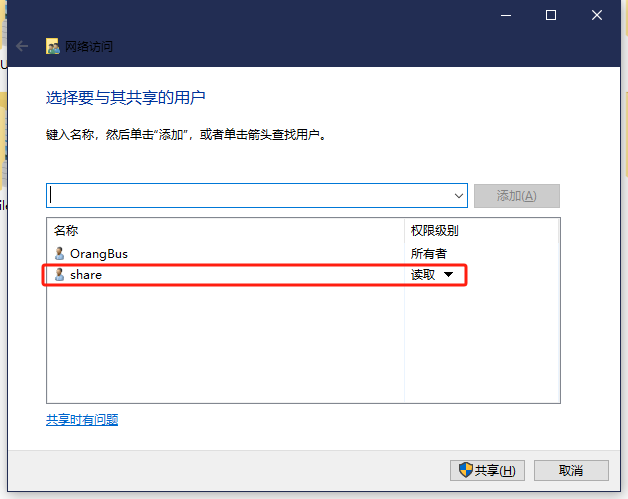
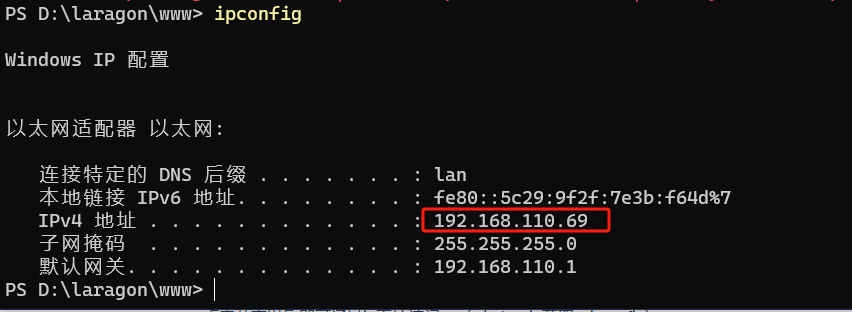
点击共享以后即可通过ip直接访问。(window ip获取:ipconfig)
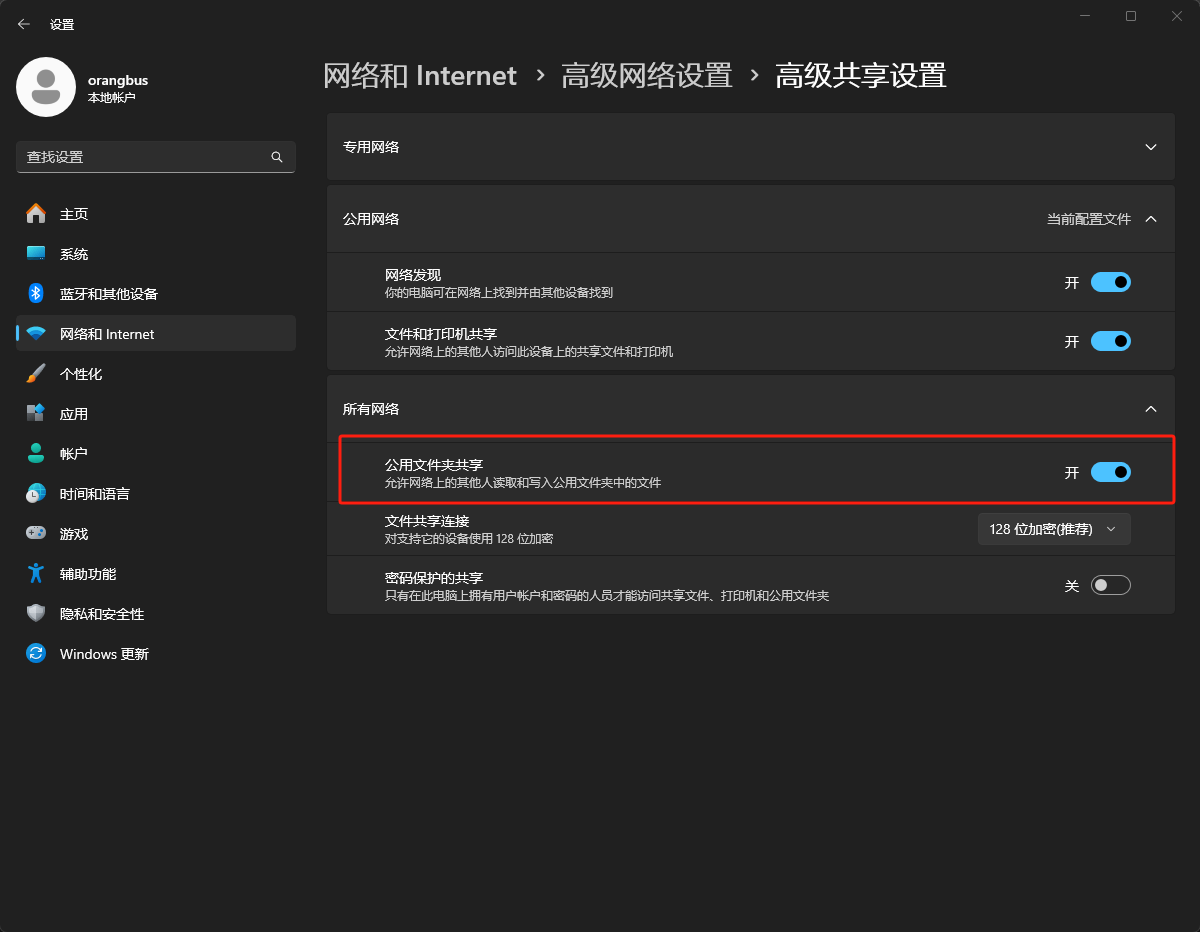
如果手机无法连接,需要开启公共文件共享
powershell 命令提示
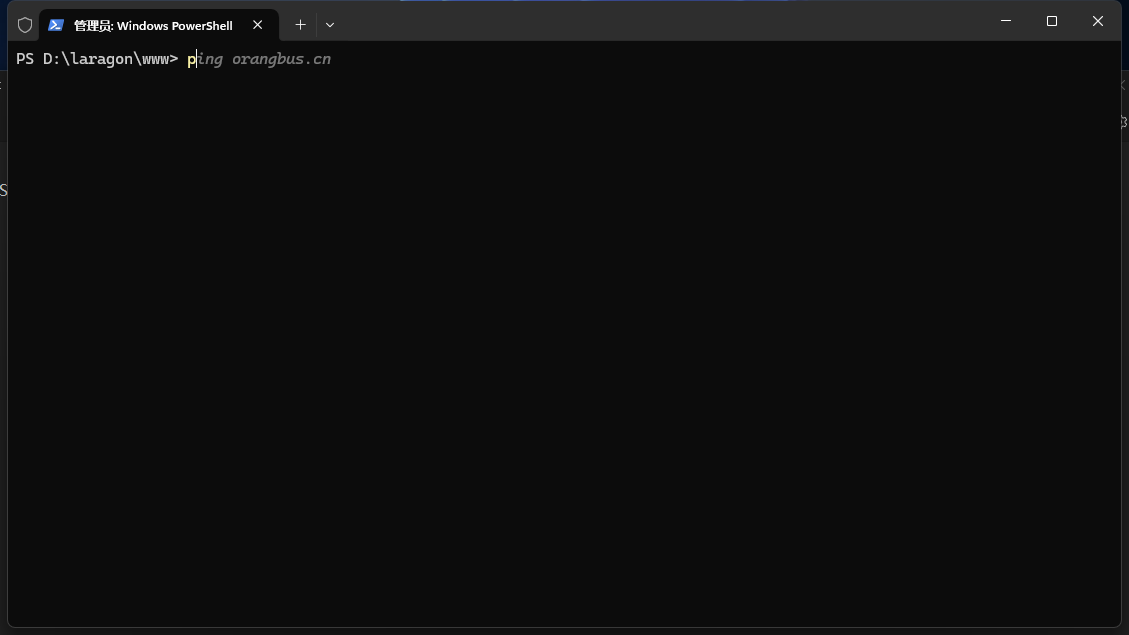
安装PSReadLine 2.1.0
Install-Module PSReadLine -RequiredVersion 2.1.0
检查是否存在配置文件
Test-path $profile
为 false 则执行命令创建
New-item –type file –force $profile
编辑配置文件
notepad $profile
输入如下配置
Import-Module PSReadLine
Set-PSReadLineOption -PredictionSource History
运行该指令后退出终端
Set-ExecutionPolicy RemoteSigned
重新打开即可。
window优化
修改零时缓存目录
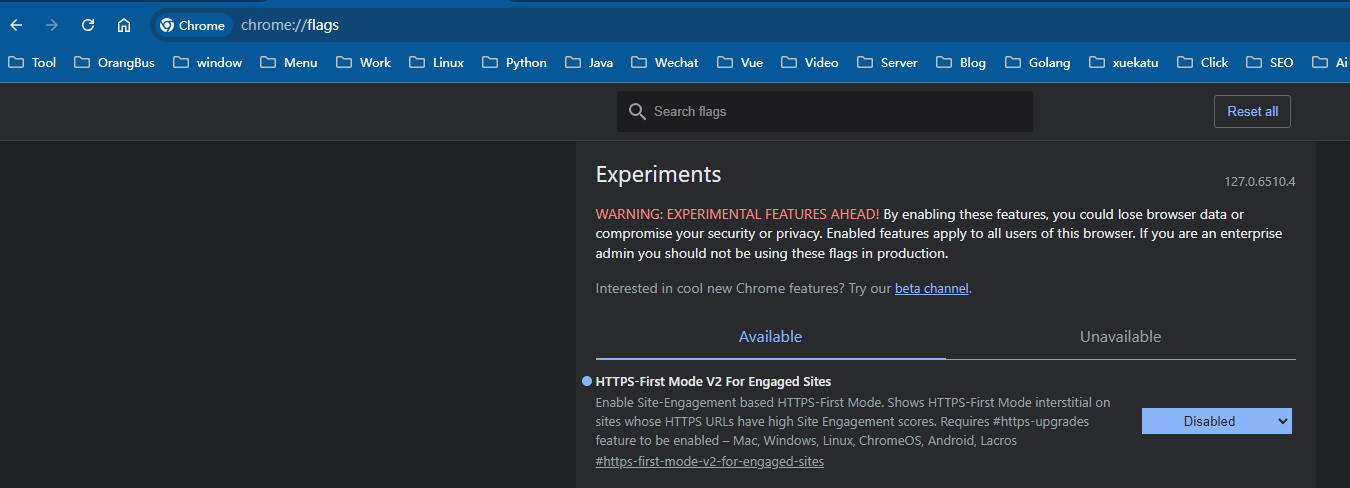
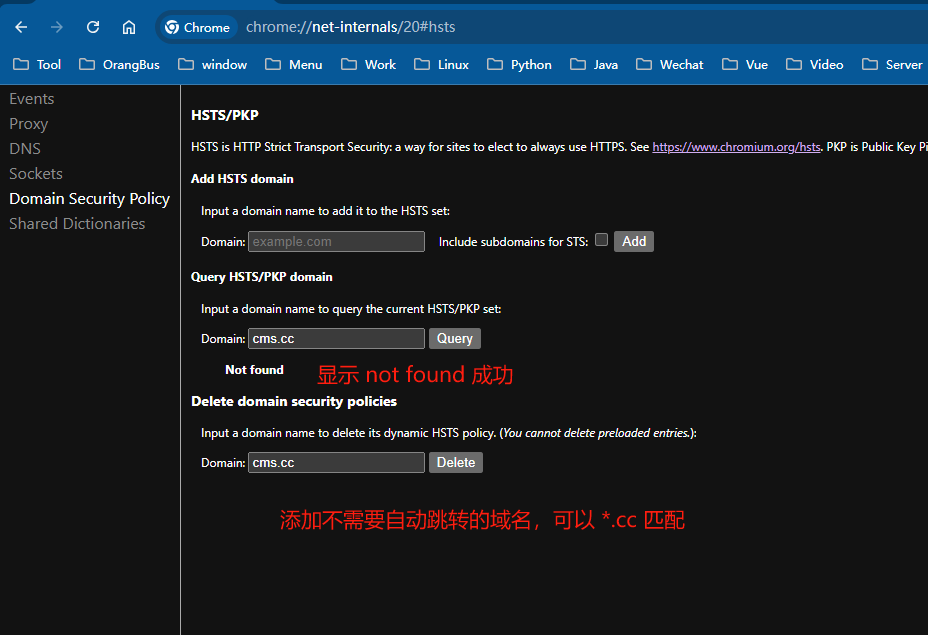
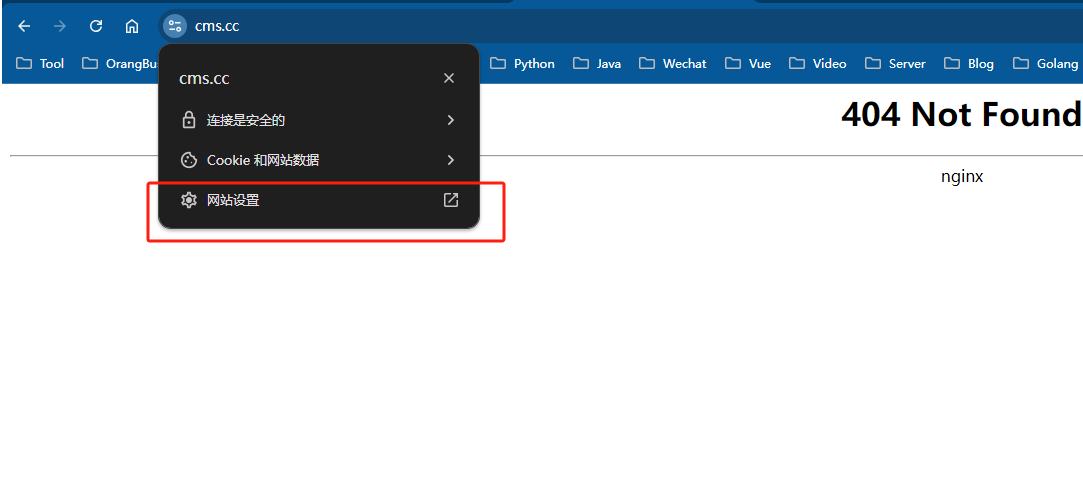
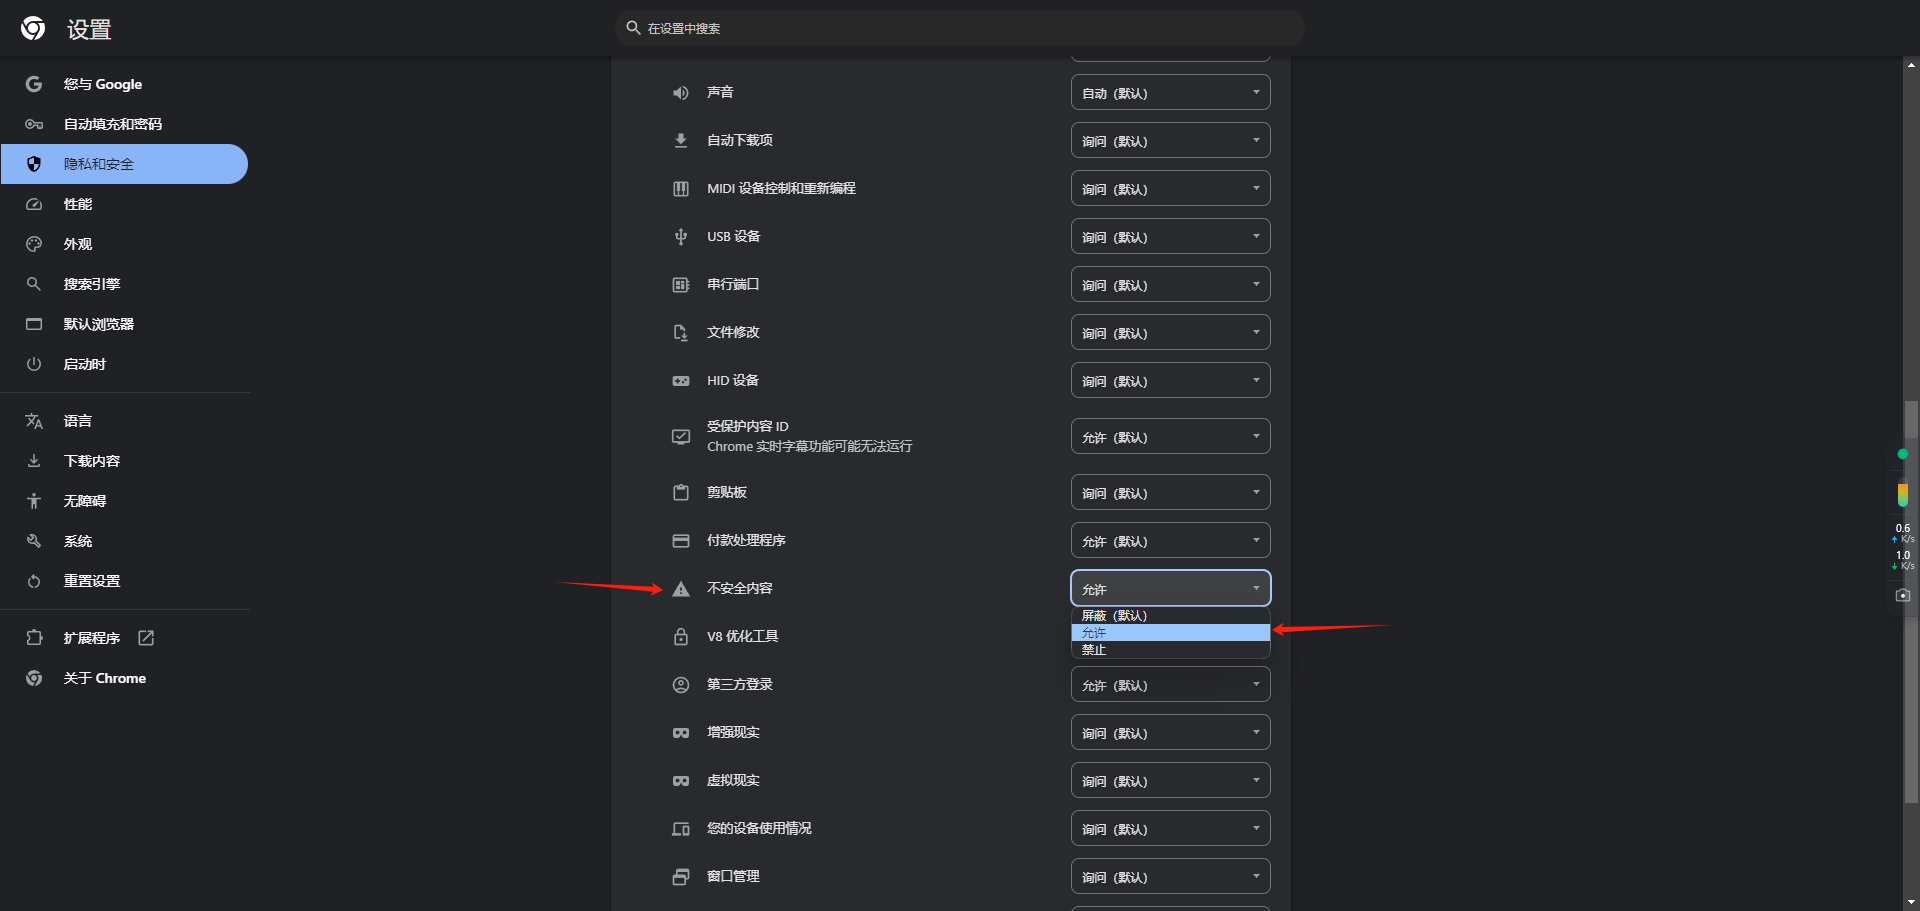
阻止http自动跳转https
方式1:浏览器打开:chrome://flags/
方式2:浏览器打开: chrome://net-internals/20#hsts
方式3:
window11 开机黑屏
打开任务管理器,新建一个任务,输入 explorer.exe
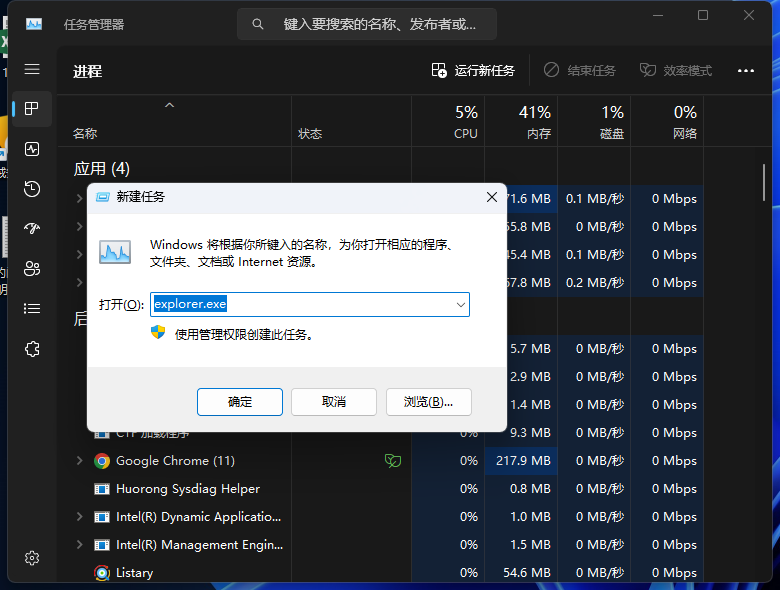
但是下次开机可能还会出现这种情况,再打开 powershell 输入
sfc /scannow
等待扫描完成,看看是否有任何系统文件被修复。
使用DISM工具修复系统映像 在管理员模式下的命令提示符或Windows终端中输入以下命令:
DISM /Online /Cleanup-Image /RestoreHealth
这将修复系统映像中的任何问题。
如果还没解决,重新安装系统吧
window11安装
https://www.ventoy.net/cn/index.html
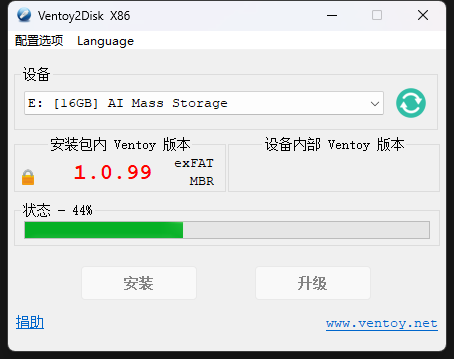
网上说可以绕过window11的限制安装的方法
{
    "control": [
            { "VTOY_MENU_LANGUAGE": "zh_CN" },
            { "VTOY_MAX_SEARCH_LEVEL": "max" },
            { "VTOY_MENU_TIMEOUT": "10" },
            { "VTOY_DEFAULT_KBD_LAYOUT": "QWERTY_USA" },
            { "VTOY_WIN11_BYPASS_CHECK": "1" },
            { "VTOY_WIN11_BYPASS_NRO": "1" }
        ]
}
查看域名解析
nslookup orangbus.cn
Server:         192.168.110.1
Address:        192.168.110.1

Non-authoritative answer:
Name:   orangbus.cn
Address: 76.76.21.22
杀死占用端口程序
查询
netstat -aon | findstr "3000"
-----------------------------------------------------------------------------
(base) PS D:\laragon\www> netstat -aon | findstr "3000"
  TCP    127.0.0.1:3000         0.0.0.0:0              LISTENING       22156
  TCP    127.0.0.1:3000         127.0.0.1:5649         ESTABLISHED     22156
  TCP    127.0.0.1:5416         127.0.0.1:3000         TIME_WAIT       0
  TCP    127.0.0.1:5649         127.0.0.1:3000         ESTABLISHED     11004
查看该端口是那个程序占用
tasklist | findstr "22156"
-----------------------------------------------------------------------------
(base) PS D:\laragon\www> tasklist | findstr "22156"
main.exe                     22156 Console                    1     39,248 K
终止程序
taskkill /F /PID 22156
window rsync
下载: https://www.cygwin.com/install.html
在安装的时候搜索软件
- git
- rsync
- vim
- wget
- libiconv
rsync -avtz --partial --progress admin@home.cc:/data /home/orangbus/data
